pydags - A lightweight DAG framework for Python
I recently released a pre-alpha version of a Python library I’ve been working on. It’s still in the very early stages of development, but this tutorial aims to give an introduction to the library and its purpose.
The library is called pydags, and its meant to serve as a lightweight alternative to the enterprise, heavyweight DAG frameworks such as Airflow, Kubeflow, and Luigi. pydags is a Python-native framework to express and execute DAG workloads, focusing on local development, with no reliance on Kubernets and Docker. It’s a quick and easy way to get started with DAG computation in Python, and has a Kubeflow-like interface for defining inter-node dependencies in the DAG.
pydags Terminology
A quick note on terminology in pydags. Firstly, a DAG is called a Pipeline in pydags. And a pipeline
consists of many Stages. In essence, pipelines and stages are synonymous with DAGs and nodes,
respectively.
Example Usage - Simple
Suppose we want to create a moderately complex DAG consisting of 6 nodes. First, we import the required classes and methods from pydags:
from pydags.pipeline import Pipeline
from pydags.stage import stage
Pipeline is the main class for defining and executing DAGs. stage is a decorator, and is one of the
ways to define stages in pydags. Next, we define a dummy stage in the form of a method. This will be
where the computation for that particular node/stage of the DAG will be defined. As we will see later,
one may also define stages as classes instead of methods.
@stage
def stage_1():
    print('Running stage 1')
This is just a dummy stage (for demonstration purposes), and thus doesn’t really do anything useful. In a real
use-case, the computation would be more significant. We can not create a few more dummy stages with this @stage
decorator:
@stage
def stage_2():
    print('Running stage 2')

@stage
def stage_3():
    print('Running stage 3')

@stage
def stage_4():
    print('Running stage 4')

@stage
def stage_5():
    print('Running stage 5')

@stage
def stage_6():
    print('Running stage 6')
Now, we can instantiate the stages, and create a pipeline. Instantiating a stage that has been defined
as a function simply means invoking __call__, for example:
stage1 = stage_1()
stage2 = stage_2()
It should be noted that this does not actually invoke the functions, but instead the decorator wraps the function and its argument in a proxy class that is readable by the Pipeline class.
In order to define inter-dependencies between pipeline stages, one simply has to call the .after() method
of a particular stage in a sort of object builder pattern. This is similar to Kubeflow in this way. Next,
we define some inter-dependencies in our 6-stage pipeline:
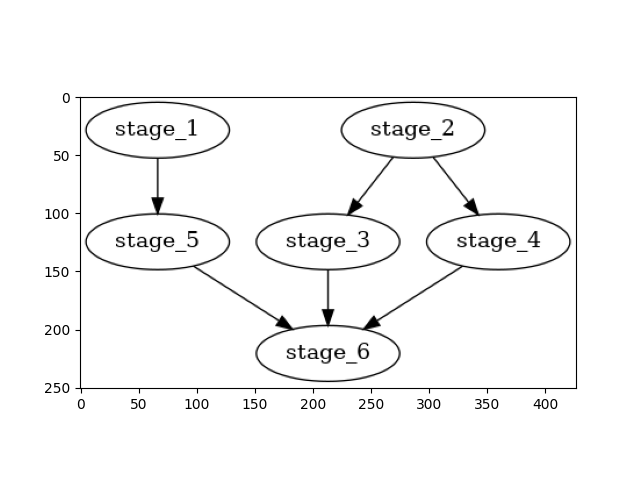
stage3 = stage_3().after(stage2)
stage4 = stage_4().after(stage2)
stage5 = stage_5().after(stage1)
stage6 = stage_6().after(stage3).after(stage4).after(stage5)
In the first line above, we tell pydags that the computation for Stage 3 must occur after Stage 2, and so on. We can now define the pipeline:
pipeline = Pipeline()

pipeline.add_stages([
    stage1, stage2, stage3,
    stage4, stage5, stage6
])
The two primary methods for a Pipeline object are visualize and start. Firstly, visualize simply renders a
visual representation of the pipeline in a matplotlib figure. For this Pipeline, the following figure is shown when
running pipeline.visualize():
The .start() method invokes the execution of the pipeline. All the stages will execute in the order defined by the
user. One may specify a positive integer for the num_cores parameter of the .start() method in order to run
stages of the pipeline in parallel (those which can be run in parallel, such as stages 1 and 2, or stages 3, 4,
and 5). pydags will distribute the computation over the number of CPU specified.